
Why Do Semi Tubular Rivets Improve Joint Reliability?
Article Abstract: Semi Tubular Rivets are a go-to fastener when you need repeatable strength, clean appearance, and fast assembly—without the bulk of bolts or the looseness that can happen with poor screw selection. This in-depth guide breaks down how semi-tubular rivets work, the most common customer pain points they solve (loose joints, cracked plastics, corrosion, inconsistent clinch), and the practical design rules that help your product pass inspection and last longer. You’ll also find selection checklists, comparison tables, installation tips, and a FAQ to help you specify the right rivet with confidence.
Table of Contents
- Outline at a Glance
- What Are Semi Tubular Rivets
- Customer Pain Points and How Semi-Tubular Rivets Solve Them
- How to Choose the Right Semi Tubular Rivets
- Design and Installation Best Practices
- Quality Checks That Prevent Field Failures
- When to Consider Alternatives
- Working with a Reliable Rivet Supplier
- FAQ
Outline at a Glance
- Basics: What semi-tubular rivets are and how they form a joint.
- Pain points: Common failures in real products and the fixes.
- Selection: Size, grip range, head style, material, and finish.
- Process: Hole sizing, tooling, setting force, and consistency.
- Quality: Inspection items that stop defects before shipment.
- Decision: When to use another fastener instead.
- Sourcing: What to ask a supplier to prove stability and capability.
What Are Semi Tubular Rivets
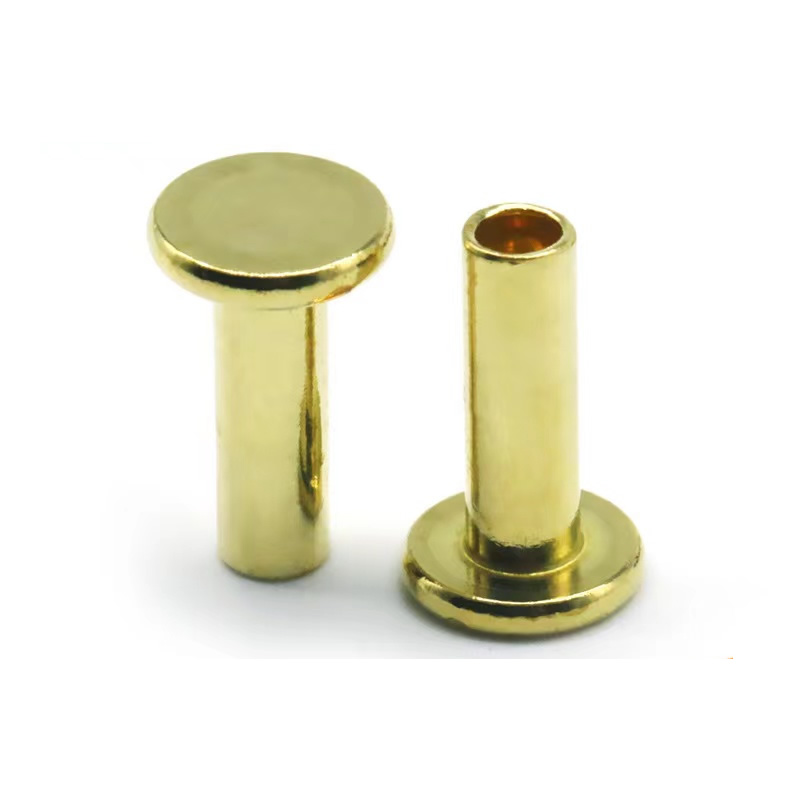
Semi Tubular Rivets are rivets with a partially hollow shank at the tail end. That small cavity is not a cosmetic detail—it’s the reason these rivets set quickly and consistently. During installation, a setting tool rolls or flares the hollow end outward, forming a second “head” (often called a clinch) that clamps the parts together.
Because less metal must be displaced than with a solid rivet, semi-tubular rivets typically require lower setting force and can be installed at high speed. That makes them a strong match for manufacturing lines where cycle time, repeatability, and a clean finished look matter.
- Key idea: The hollow tail helps control deformation, leading to stable clinch formation.
- Typical uses: Hinges, latches, small mechanisms, appliances, automotive interiors, electronics housings, leather goods, and lightweight assemblies.
- Where they shine: When you want strong shear performance with neat appearance and efficient production.
Customer Pain Points and How Semi-Tubular Rivets Solve Them
Most buyers don’t wake up excited to “choose rivets.” They choose them because something hurts: assembly is slow, parts loosen in the field, plastics crack, corrosion shows up, or quality varies batch to batch. Here’s how Semi Tubular Rivets address the most common headaches.
-
Pain Point 1: Screws loosen over time (vibration, cycling, handling).
Semi-tubular rivets create a permanent mechanical joint. When properly set, there’s no thread back-out risk, and vibration resistance improves without relying on chemical thread lockers. -
Pain Point 2: Assembly speed is too slow or labor cost is rising.
Riveting can be automated and standardized. With correct tooling and hole control, the process becomes “place + set,” reducing operator variability. -
Pain Point 3: Cosmetic issues (scratches, bulky heads, uneven clamping).
Many head styles (round, flat, countersunk, truss-like profiles) can be chosen to match appearance goals. Consistent clinch geometry also improves perceived quality. -
Pain Point 4: Cracked plastics or deformed thin sheets.
Because semi-tubular rivets need less force than solid rivets, they can be friendlier to plastics and thin metals—especially when paired with washers, bushings, or controlled flare settings. -
Pain Point 5: Corrosion and staining in real-world environments.
Material and finish selection is a major lever: stainless options, plated steel, or aluminum/brass choices can be aligned to humidity, salt exposure, galvanic concerns, and appearance needs. -
Pain Point 6: Unstable quality across suppliers or batches.
Rivets look simple, but consistency depends on wire quality, forming accuracy, heat treatment (when used), plating control, and dimensional inspection. A supplier with process controls and traceability reduces surprises.
How to Choose the Right Semi Tubular Rivets
The “best” rivet is the one that matches your joint design and your production reality. Use the checklist below to avoid the classic mistake: selecting by diameter alone and discovering later that the clinch is inconsistent or the joint feels loose.
- 1) Define the joint goal: Is this mainly for shear resistance, pivoting motion, pull-out resistance, or appearance? A hinge pin behaves differently than a rigid bracket.
- 2) Confirm total material thickness (grip): Add all layers that the rivet will clamp, including any washers or bushings.
- 3) Choose diameter: Larger diameters generally improve shear strength and bearing area, but require larger holes and may increase visible head size.
- 4) Set shank length: Length must allow proper clinch formation—too short causes weak flare; too long can buckle or create sharp edges.
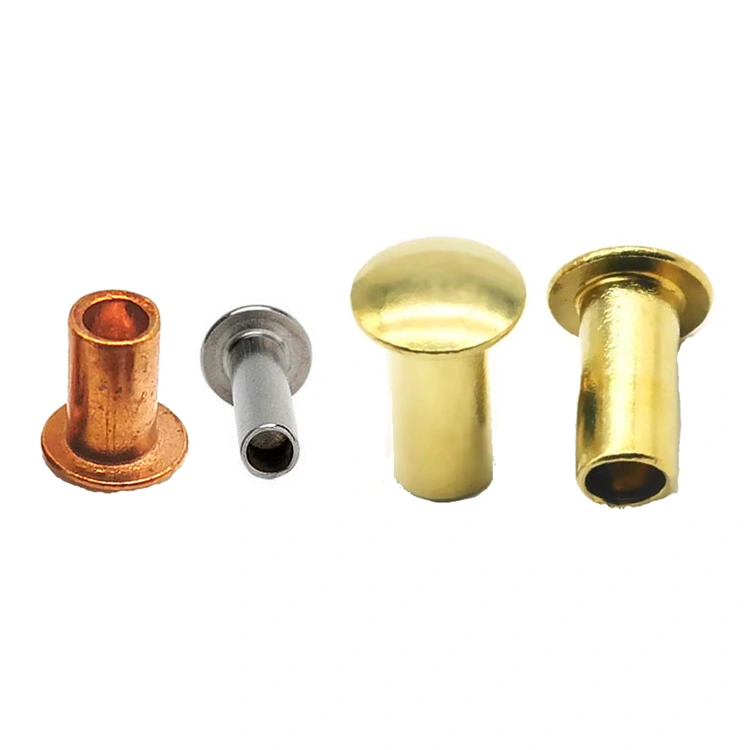
- 5) Select head style: Match appearance and clearance needs. If flush surfaces matter, consider countersunk designs (and ensure your material can support it).
- 6) Choose material and finish: Balance strength, corrosion resistance, galvanic compatibility, cost, and aesthetics.
- 7) Match tooling and process: Your available riveting method (orbital, radial, impact, roll-set) affects what dimensions and materials behave best.
| Fastener Type | Best For | Typical Advantage | Common Trade-Off |
|---|---|---|---|
| Semi Tubular Rivets | High-volume, repeatable assemblies | Fast setting, consistent clinch, good vibration resistance | Permanent joint (not designed for frequent disassembly) |
| Solid Rivets | High strength, heavy-duty applications | Very strong when properly set | Higher setting force; may be harder on thin materials |
| Blind Rivets | Access from one side only | Single-side installation | Mandrel behavior and bulbing can vary by material |
| Screws/Bolts | Serviceable assemblies | Easy disassembly and maintenance | May loosen under vibration; needs torque control |
| Material Option | Strength Profile | Corrosion Behavior | Typical Use Case |
|---|---|---|---|
| Carbon Steel (with plating) | Strong, economical | Depends on plating and environment | General industrial products, indoor mechanisms |
| Stainless Steel | Strong with good durability | Better resistance in humid/corrosive settings | Outdoor hardware, appliances, marine-adjacent use |
| Aluminum | Lighter, lower strength | Good in many environments; watch galvanic pairs | Lightweight assemblies, electronics, consumer goods |
| Brass/Copper Alloys | Moderate | Good corrosion behavior; attractive finish | Decorative goods, electrical considerations, premium look |
Design and Installation Best Practices
A rivet joint is only as good as the system around it: hole size, stack-up, tooling, and process control. If you want fewer rejects and fewer returns, these practical rules do the heavy lifting.
- Control hole diameter and roundness. Oversized or out-of-round holes are a top cause of wobble and inconsistent clinch. Treat hole quality as a critical dimension, not an afterthought.
- Respect grip range. If your stack thickness varies, specify a rivet length that still forms a solid clinch at the thinnest stack. For thicker stacks, consider a different length or a controlled bushing.
- Choose the right setting method. Orbital or radial riveting often produces smoother, more controlled forming than a hard impact set, which can be useful for cosmetic parts and plastics.
- Prevent material damage. For plastic or thin sheet assemblies, use backing washers, sleeves, or flaring profiles that distribute load and reduce stress concentration.
- Design for motion when needed. If the rivet is acting as a pivot (like a hinge), the target is controlled rotation—not maximum clamp. Bushings or spacers help maintain smooth movement without binding.
- Avoid sharp clinch edges. Poorly formed tails can create burrs that cut hands, snag fabrics, or interfere with neighboring parts. Tooling geometry matters.
Quick “spec-to-production” checklist:
- Confirm stack thickness range (min/nominal/max).
- Lock hole tolerance and surface finish targets.
- Define head style and appearance requirements.
- Decide material + finish based on environment exposure.
- Validate clinch dimensions with first-article samples.
- Document the setting process (tool, force, cycle, inspection points).
Quality Checks That Prevent Field Failures
Buyers often blame “bad rivets” when the real culprit is uncontrolled variation—wire hardness shifts, plating thickness drifts, or clinch geometry isn’t being measured. A simple, repeatable inspection plan dramatically reduces risk.
- Dimensional inspection: Shank diameter, length, head diameter/height, and hollow depth should match spec. Consistent hollow geometry supports consistent clinch formation.
- Finish inspection: Look for peeling, discoloration, or uneven coating that can trigger corrosion or cosmetic rejection.
- Setting validation: Measure clinch diameter and clinch height after installation. These two numbers often predict joint performance better than “it feels tight.”
- Mechanical checks: For critical parts, run shear/pull tests on assembled samples. Trending results over time catches drift early.
- Traceability: Lot tracking helps isolate issues quickly instead of turning one defect into a full production shutdown.
If your product is customer-facing, consider an additional “appearance standard” for riveted areas: acceptable head marks, allowable tool ring patterns, and permitted finish variation. That prevents subjective disagreements at final inspection.
When to Consider Alternatives
Semi Tubular Rivets are excellent, but they’re not a universal answer. If your team is struggling, it may be because the joint requirement doesn’t match a permanent clinched fastener.
- Choose screws/bolts if you need serviceability, frequent disassembly, or adjustable clamp force.
- Choose blind rivets if you only have access from one side.
- Choose solid rivets if the joint is heavy-duty and you can support higher setting force with robust tooling and materials.
- Consider adhesive + rivet in some designs where you need sealing, vibration damping, or load distribution—while the rivet provides immediate handling strength.
Working with a Reliable Rivet Supplier
Here’s the part that saves you from “we changed suppliers and everything started failing.” A dependable supplier doesn’t just sell a part; they maintain stability across batches, support engineering questions, and help you avoid redesign loops.
Nuote Metals Technology Co.,Ltd. supports Semi Tubular Rivets projects where buyers need consistent forming quality, material options, and production-friendly specifications. When evaluating a supplier (including Nuote Metals Technology Co.,Ltd. or anyone else), ask questions that reveal process maturity—not just pricing.
- Can you provide material and process consistency? Look for stable sourcing, defined inspections, and lot control.
- Can you customize dimensions and head styles? Many assemblies require non-standard lengths, head profiles, or special hollow geometries.
- Can you recommend hole tolerances and setting methods? The best suppliers understand that a rivet is part of a system.
- How do you handle first-article sampling? Early samples should validate clinch geometry and appearance before mass production.
- What’s the plan for surface finish and corrosion expectations? A good supplier clarifies environment assumptions and finish limitations upfront.
FAQ
-
Q: What makes Semi Tubular Rivets different from solid rivets?
A: Semi-tubular rivets have a partially hollow tail, so they need less force to set and can form a consistent clinch quickly. Solid rivets are fully solid and typically require higher force and sturdier parts/tooling. -
Q: How do I prevent a riveted joint from feeling loose?
A: The most common causes are oversized holes, incorrect rivet length for the actual grip, or inconsistent setting. Tighten hole tolerances, match grip range, and verify clinch diameter/height after setting. -
Q: Are Semi Tubular Rivets suitable for plastic parts?
A: Often yes—especially because the setting force can be lower than solid rivets. Use washers, sleeves, or controlled forming to distribute load and reduce stress that can crack plastics. -
Q: What’s the best material choice for outdoor use?
A: Stainless steel is frequently chosen for humid or corrosive environments. Plated steel can work too, but you should match plating type and thickness to exposure conditions and appearance requirements. -
Q: Can Semi Tubular Rivets be removed for repairs?
A: They are designed as permanent fasteners. Removal typically involves drilling out the rivet, which may damage surrounding materials. If serviceability is a priority, consider threaded fasteners or a design with replaceable pivot hardware. -
Q: What should I verify during incoming inspection?
A: Check shank diameter, length, head dimensions, hollow depth, finish quality, and sample-setting results (clinch diameter and height). These directly affect assembly stability and appearance.
Final takeaway: Semi Tubular Rivets are a practical way to get fast, repeatable, vibration-resistant joints—when you control hole quality, grip range, and clinch formation. If you’re building a new product or fixing a recurring joint failure, the fastest path is to confirm your stack-up, lock the rivet dimensions to the process, and validate the clinch with measurable criteria.
If you want help specifying Semi Tubular Rivets for your application—materials, dimensions, finishes, and production fit—reach out to Nuote Metals Technology Co.,Ltd. and contact us to discuss your drawings, samples, and performance targets.
Previous:The Simple Strength of a Brass Rivet
Send Inquiry


X
We use cookies to offer you a better browsing experience, analyze site traffic and personalize content. By using this site, you agree to our use of cookies.
Privacy Policy